

Originally posted on Ronen Bekerman - 3D Architectural Visualization & Rendering Blog
Software used: Cinema 4D, Vray, Photoshop
Introduction
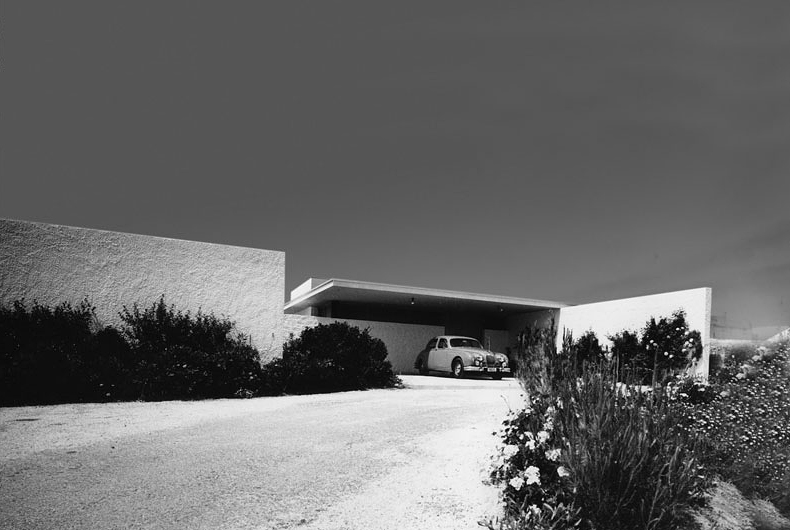
Long time ago I came across a greek architect by the name of Nicos Valsamakis. He rose to fame in the ninety sixties with spectacular designs of villas. For years I had this particular photograph from his "Villa Lanaras, Anavyssos" on my desktop. Always thinking that one day I'm gonna try to create a rendering from this shot.Here's the original photograph (source: midmodandmore.blogspot.ch).
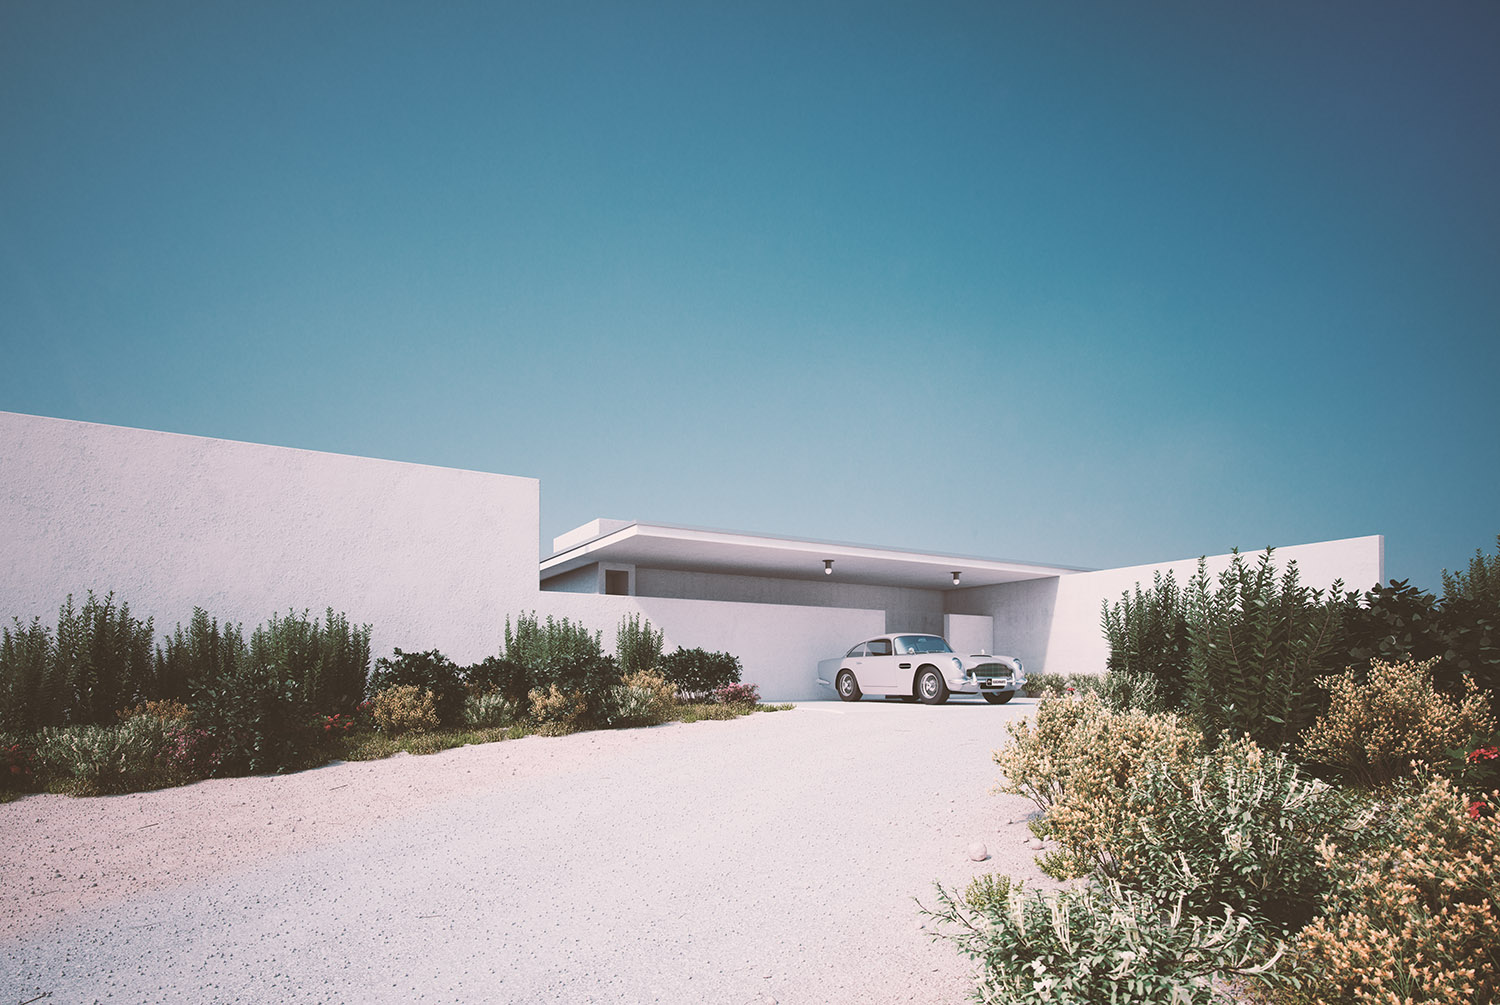
Then after a while I finally did it, here's the result.
Modeling
The modeling part was obviously very simple in this case. It's easy to get the right height proportions from the photo with some guidelines. We could even calculate the right depth by using some simple math, or in my case guesswork: (https://de.wikipedia.org/wiki/Rekonstruktion_(Darstellende_Geometrie) - Article only available in German). Starting point was a estimation of 150 cm height for the car.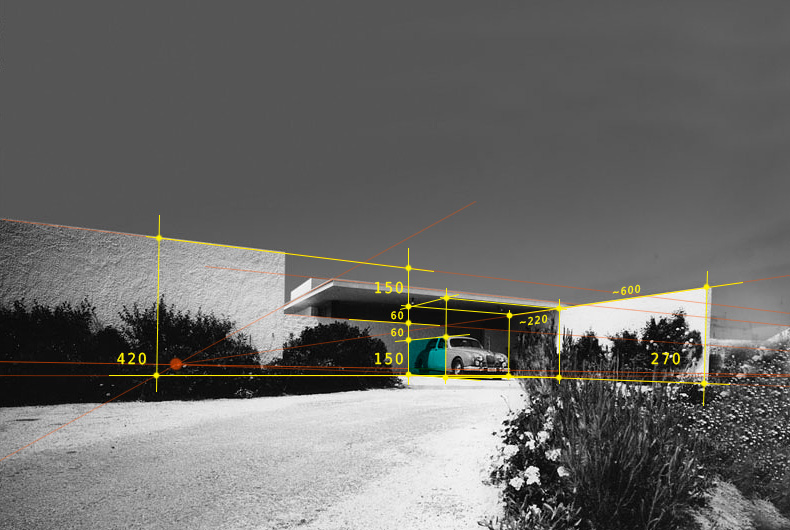
The Model consists of cubes placed in the right place with the a fore assumed proportions. Some extruding and voila. Nothing magic here.
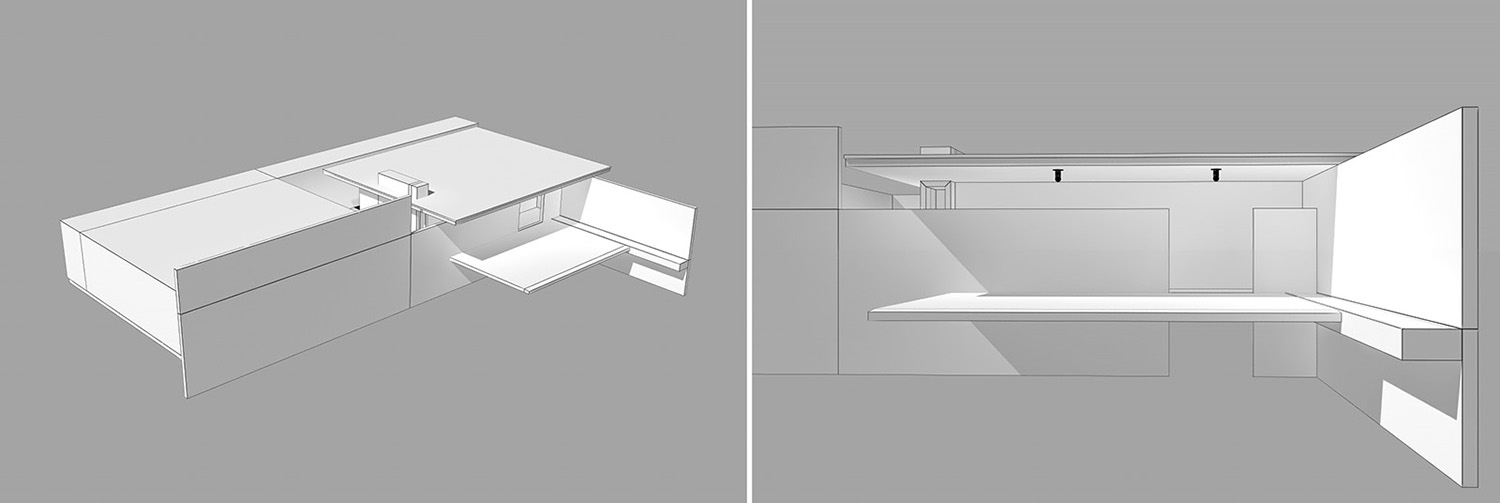
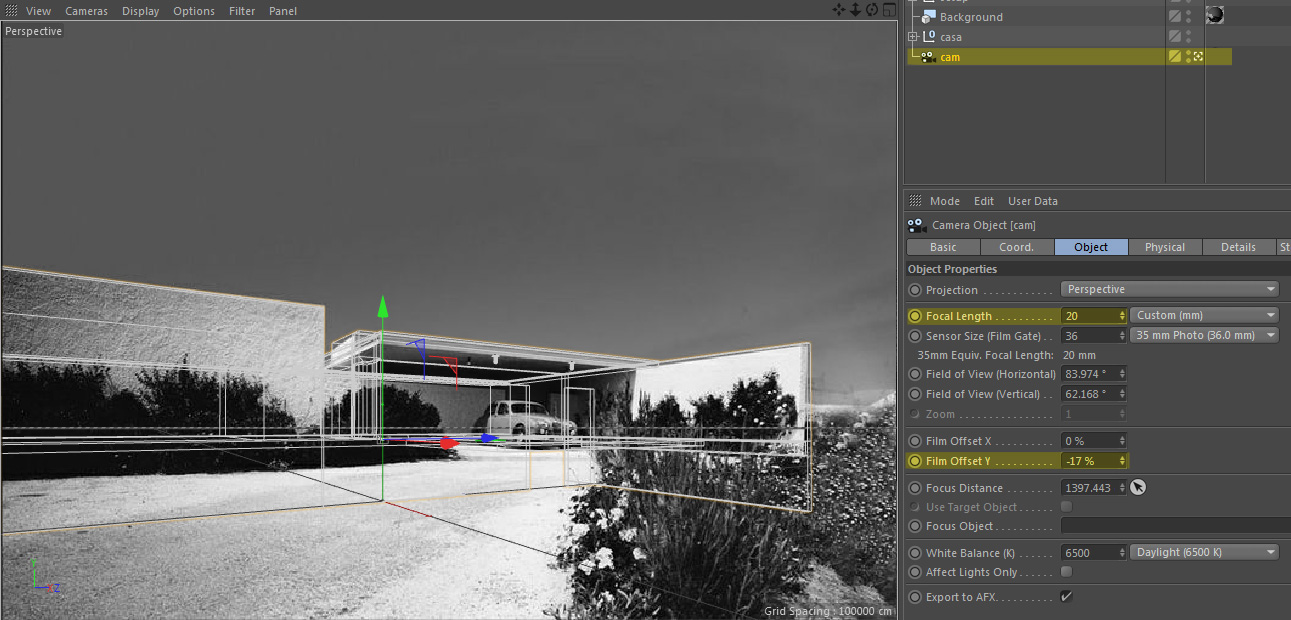
In order to check the modeling process and to match the camera position and focal length I placed the original photo in the background of the semi transparent model of the house. While sitting in the camera I moved and rotated manually until the preview more or less with the original photo.
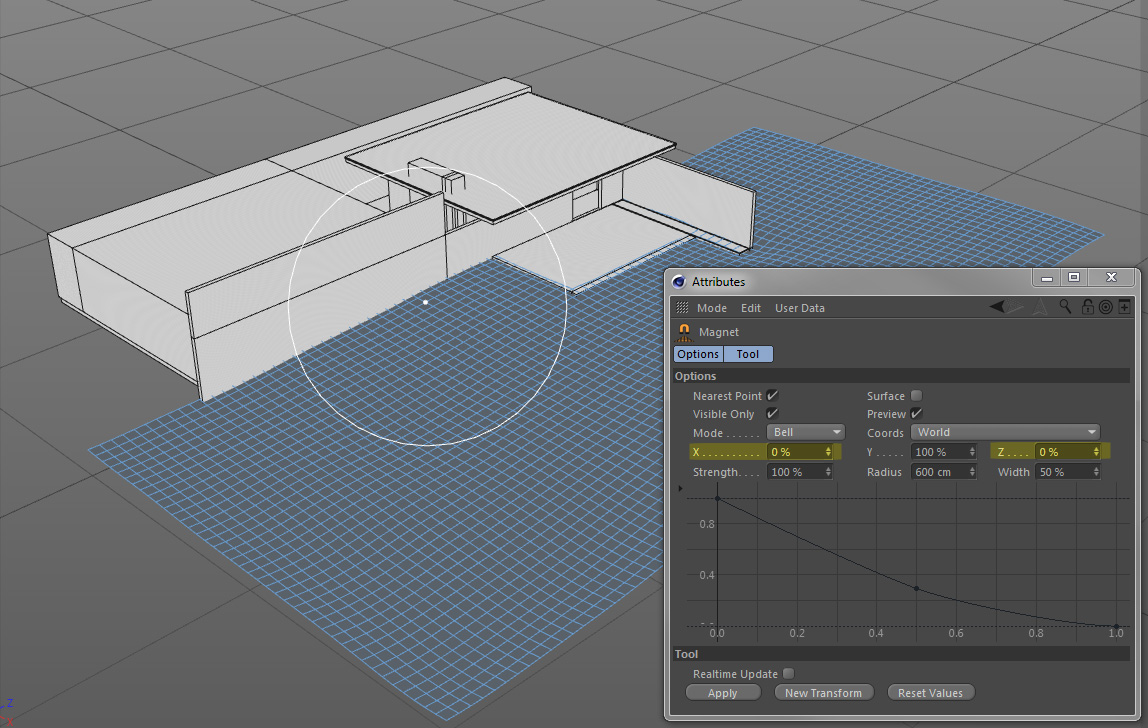
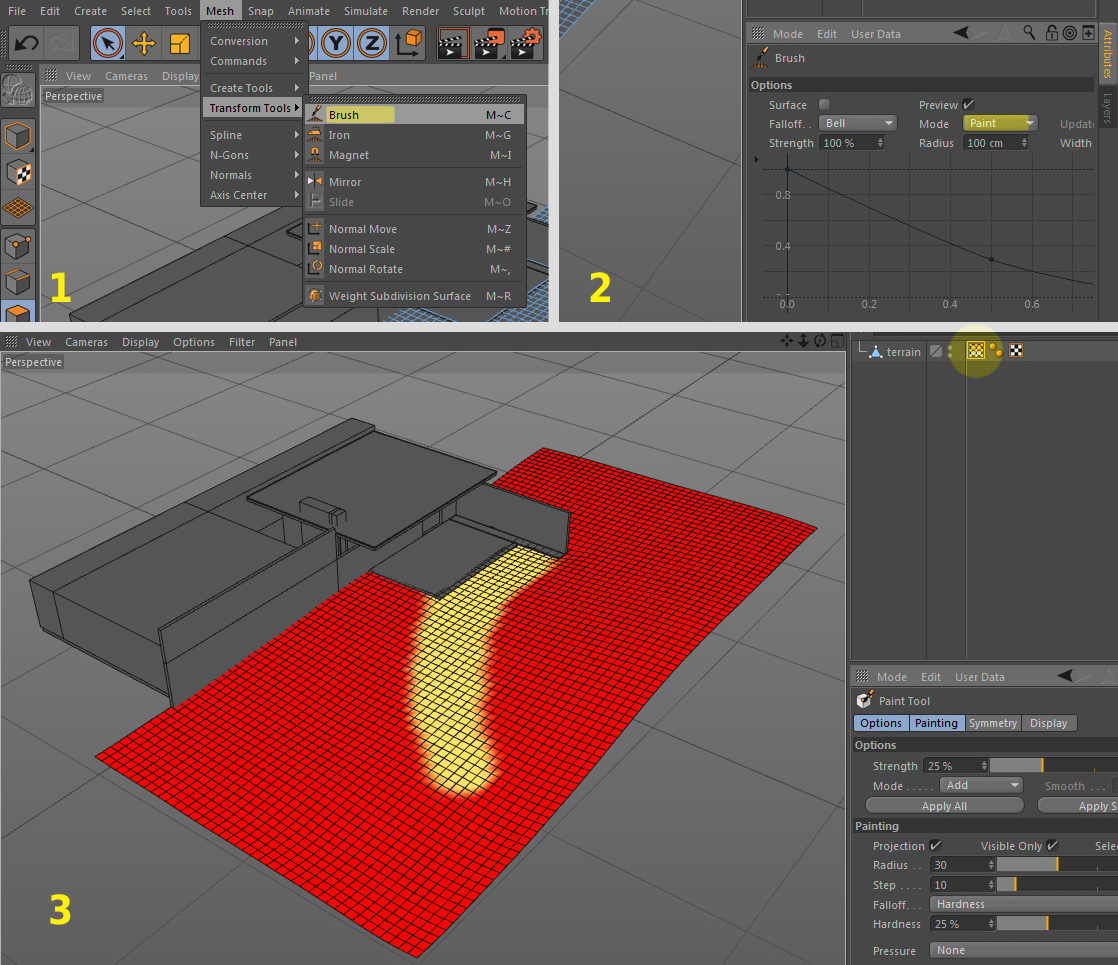
Still using the picture as reference I used a simple plane for the terrain. Subdivided just enough to be able to get the main contour lines. Then I just "painted" the terrain by subtly changing the Z value of the vertices with the "Magnet" tool (keeping X and Y locked).
Lighting
Opposed to elsewhere light comes after modeling. I knew I was going to use an HDRI in order to get a realistic rendering. While Vray Physical Sun and Sky render faster, I still prefer a high quality HDRI for optimized results. This is especially the case for exterior renderings. Here's a interesting post about HDRI quality: http://www.aversis.be/tutorials/vray/vray-high-dynamic-range-hdri.htm. I used Peter Guthrie's 1224 Clear Sky (http://www.pg-skies.net/collections/series1/products/hdri1224) in a Area/Dome light. By using a C4D "Filter" I lowered the gamma value to 0.7 in order to get sharper shadows.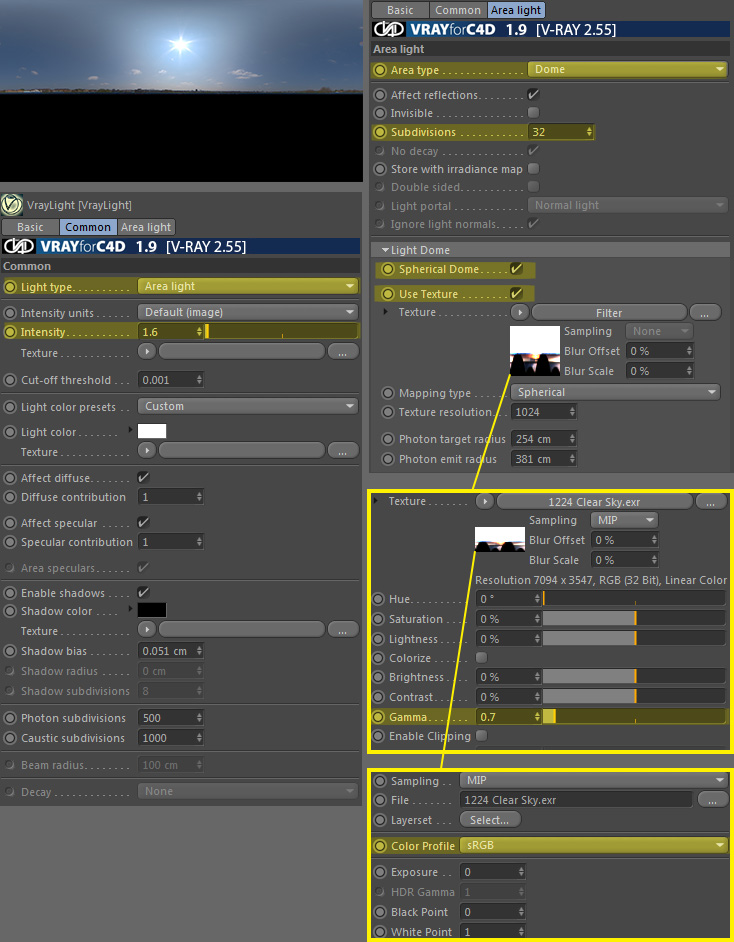
Environment
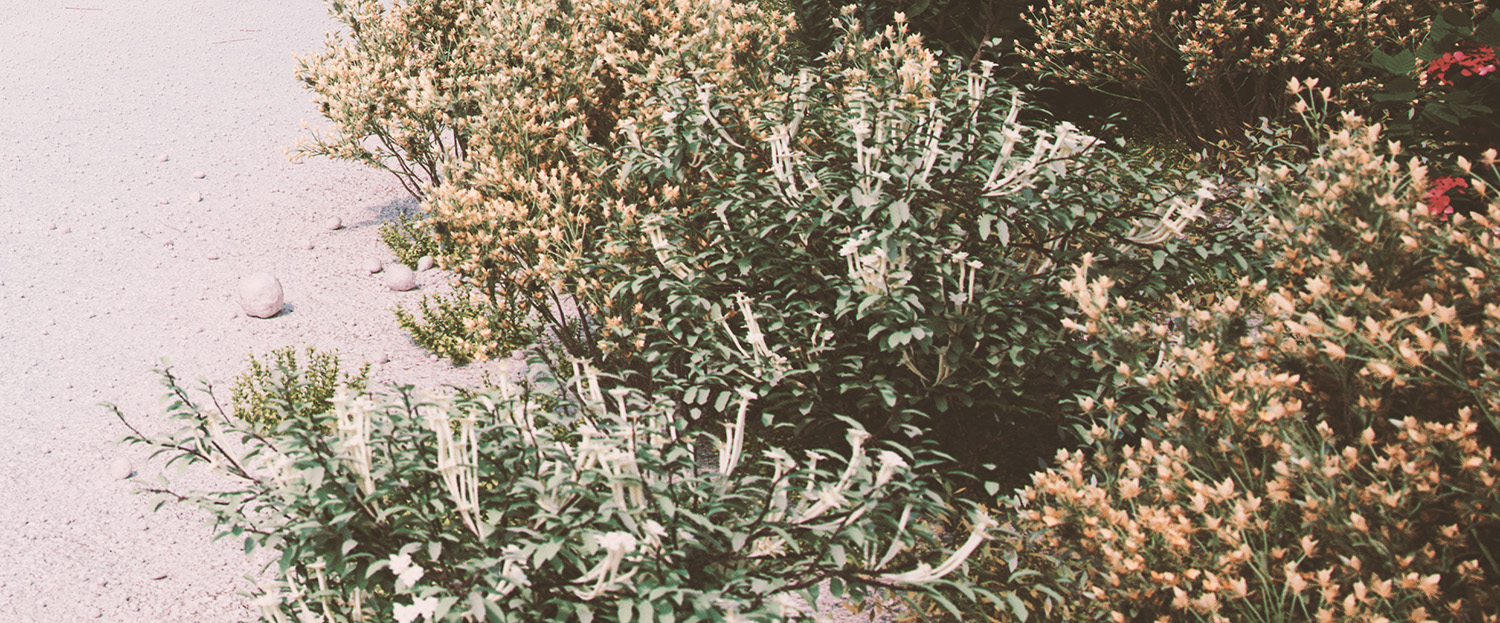
Time for the most time consuming part of the project. The environment and as part thereof the vegetation is where I invested the most time, getting the small details right. I wanted plants etc. to be as realistic as possible in order catch the eye and lock it on to details that don't look too organized. Giving the whole scene a touch of organic chaos in contrast to the very structured look of the house itself. I used 36 individual models from my personal library (some Evermotion, Turbosquid, HQ-Plants and a few self-made models too).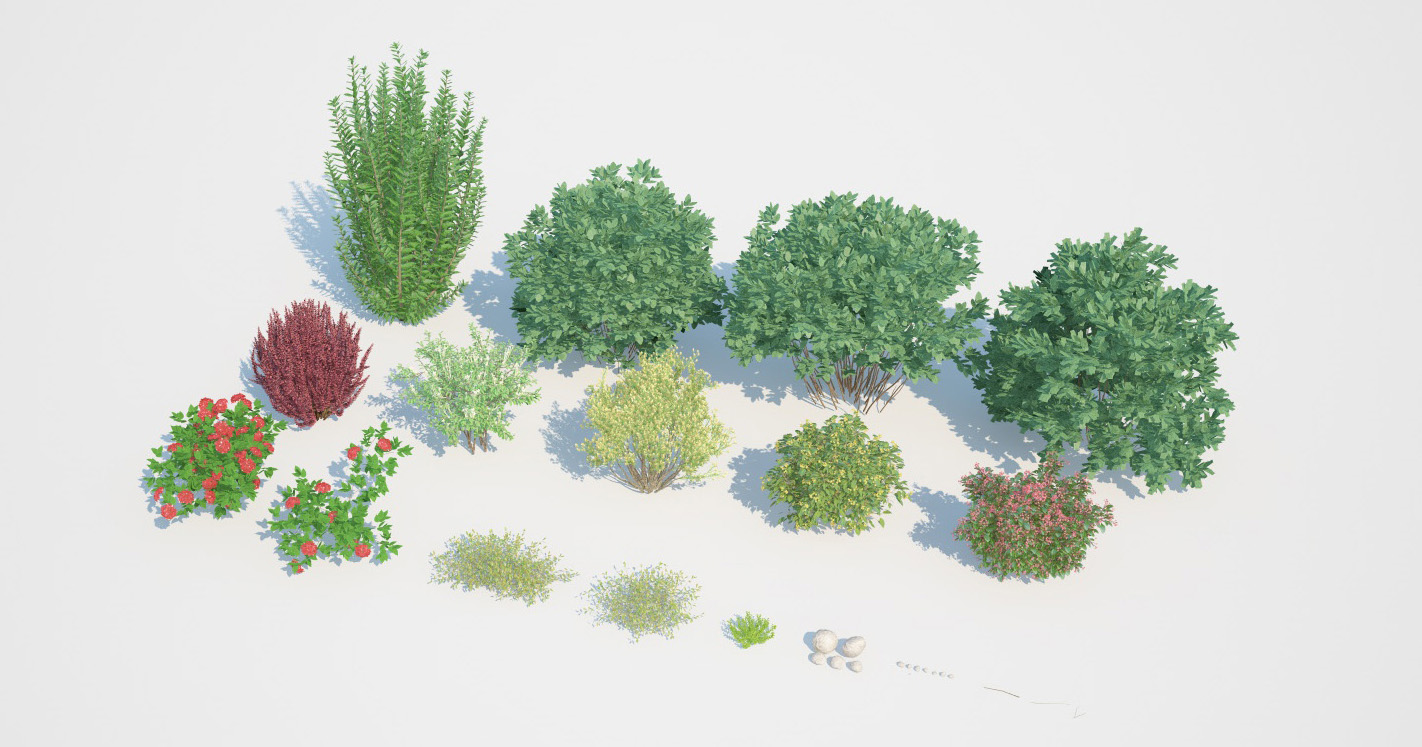
Here's a top-view of the plants, stones, branches etc, as placed in the scene.
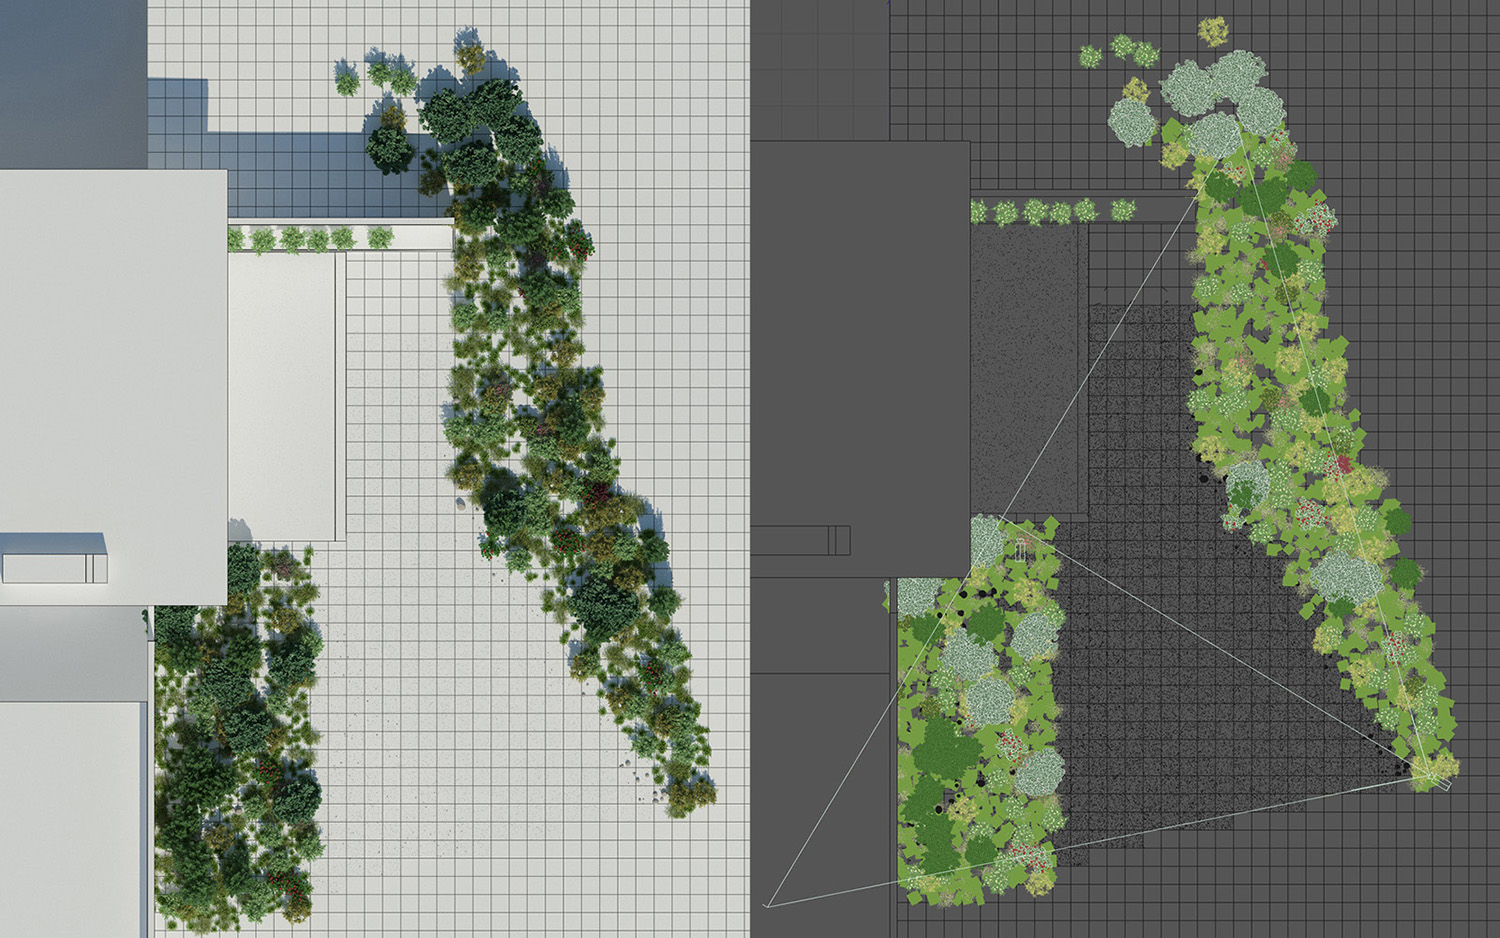
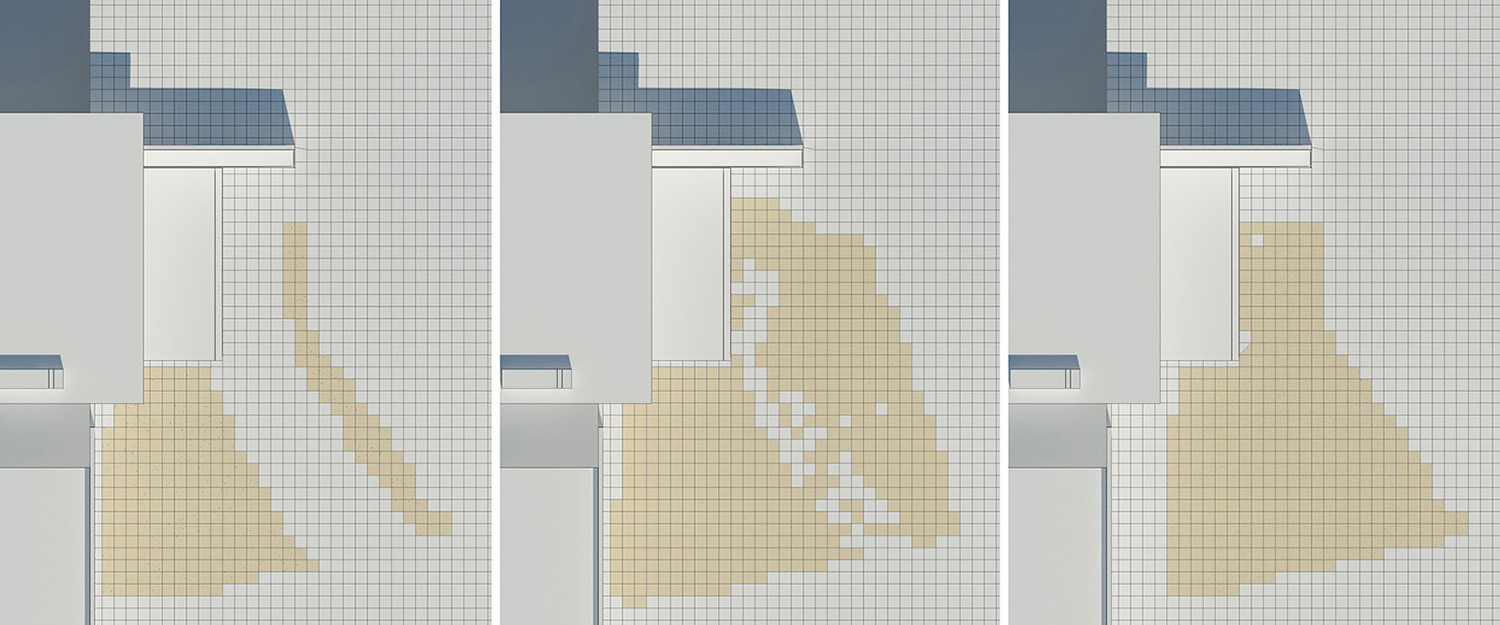
Usually I start by placing the largest plants first and filling in with objects decreasing in size. First I duplicated the terrain plane and removed the polygons, where no plants would be placed. Using Cinema4D's fabulous "MoGraph" object I distributed my models on the remaining polygons with the "Random Effector" linked into "MoGraph" in order to rotate and scale the objects automatically and randomly.
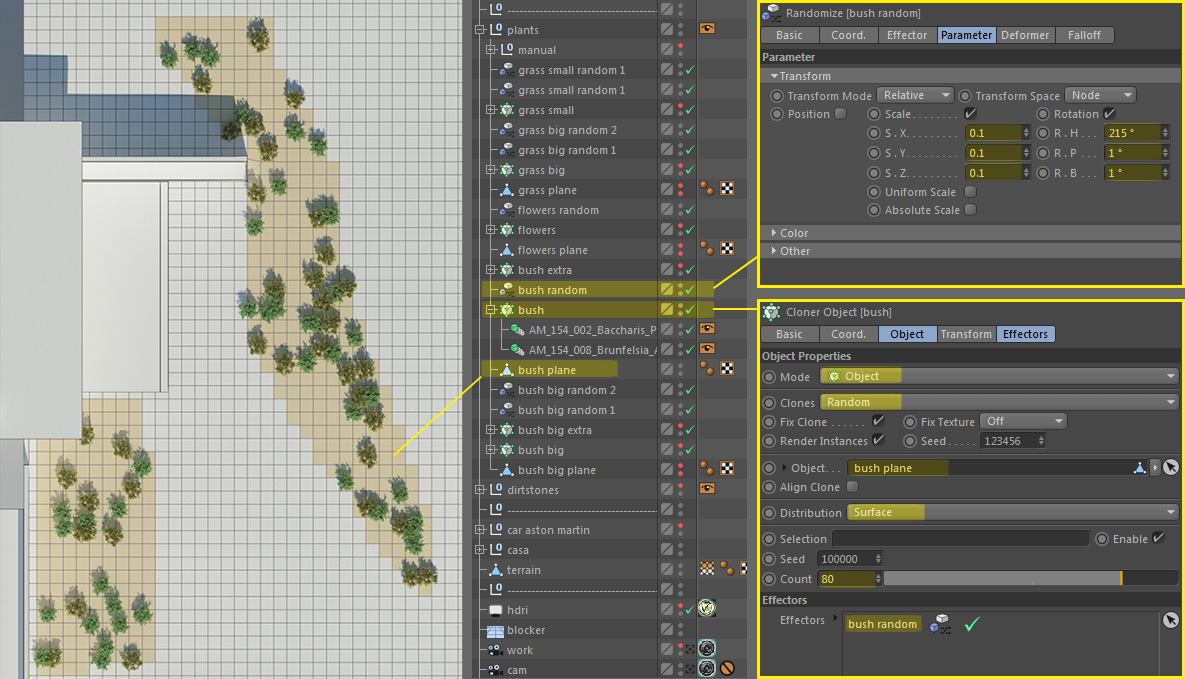
Starting with a few large ones, and filling it with more and more smaller objects.
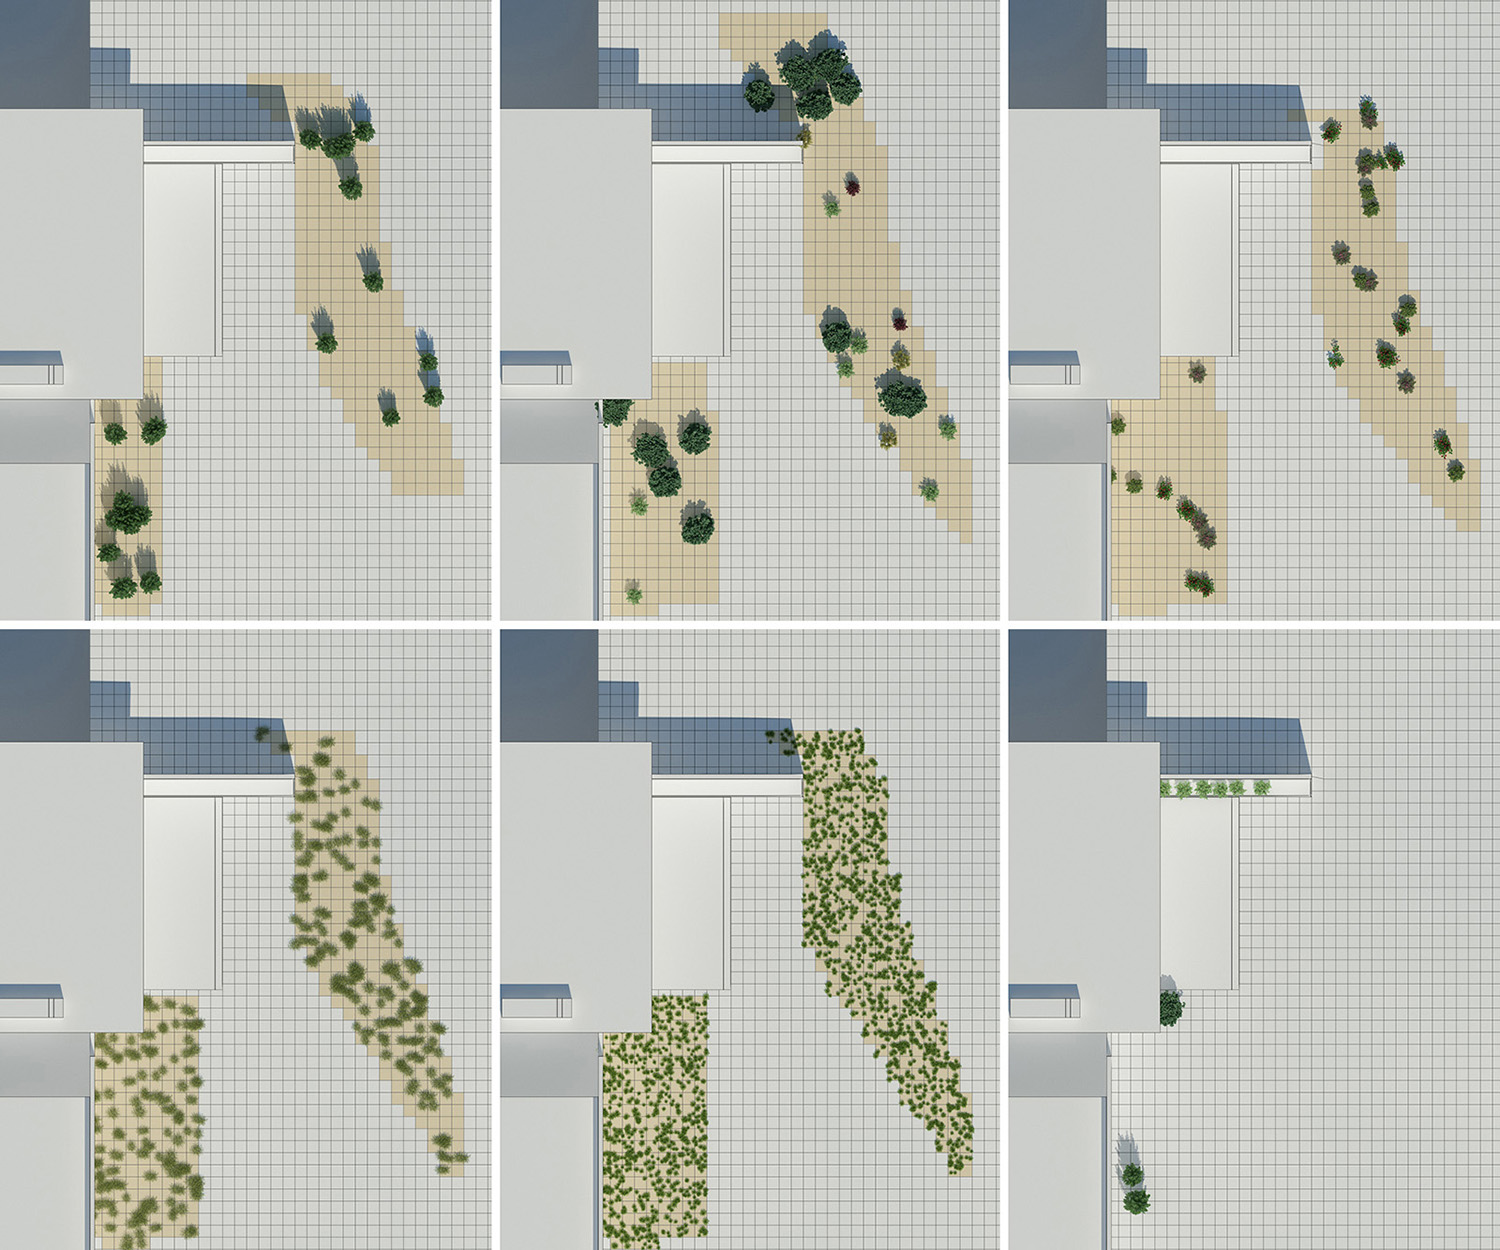
For the road I used the same technique, from the larger stones and objects to small pebbles.
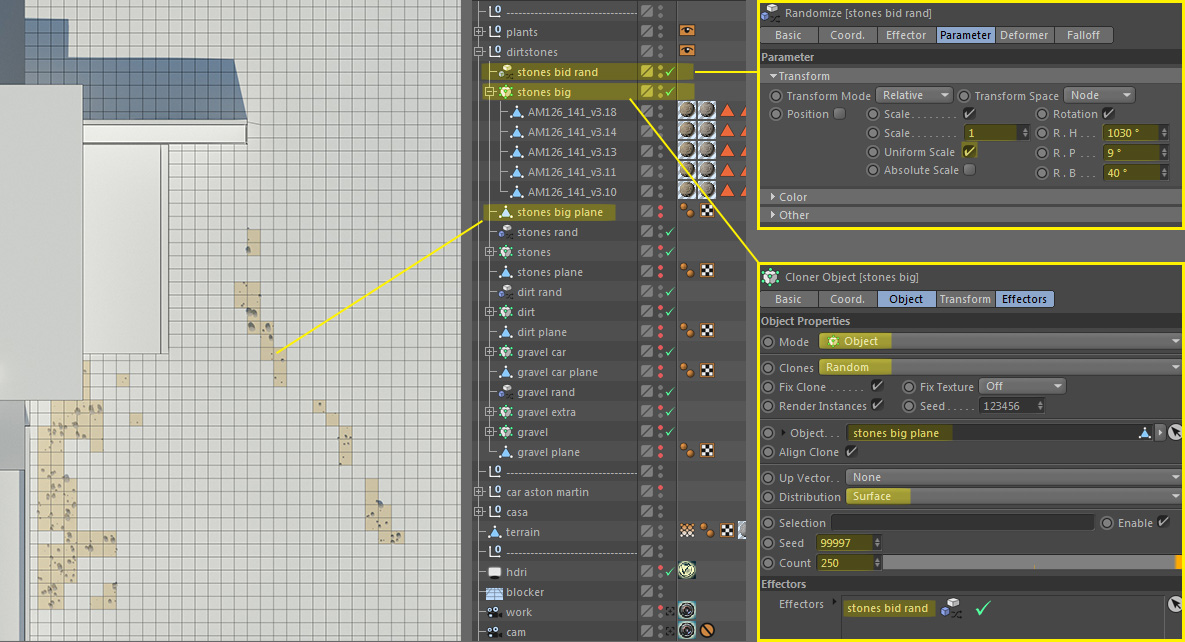
Here's an image of the result.
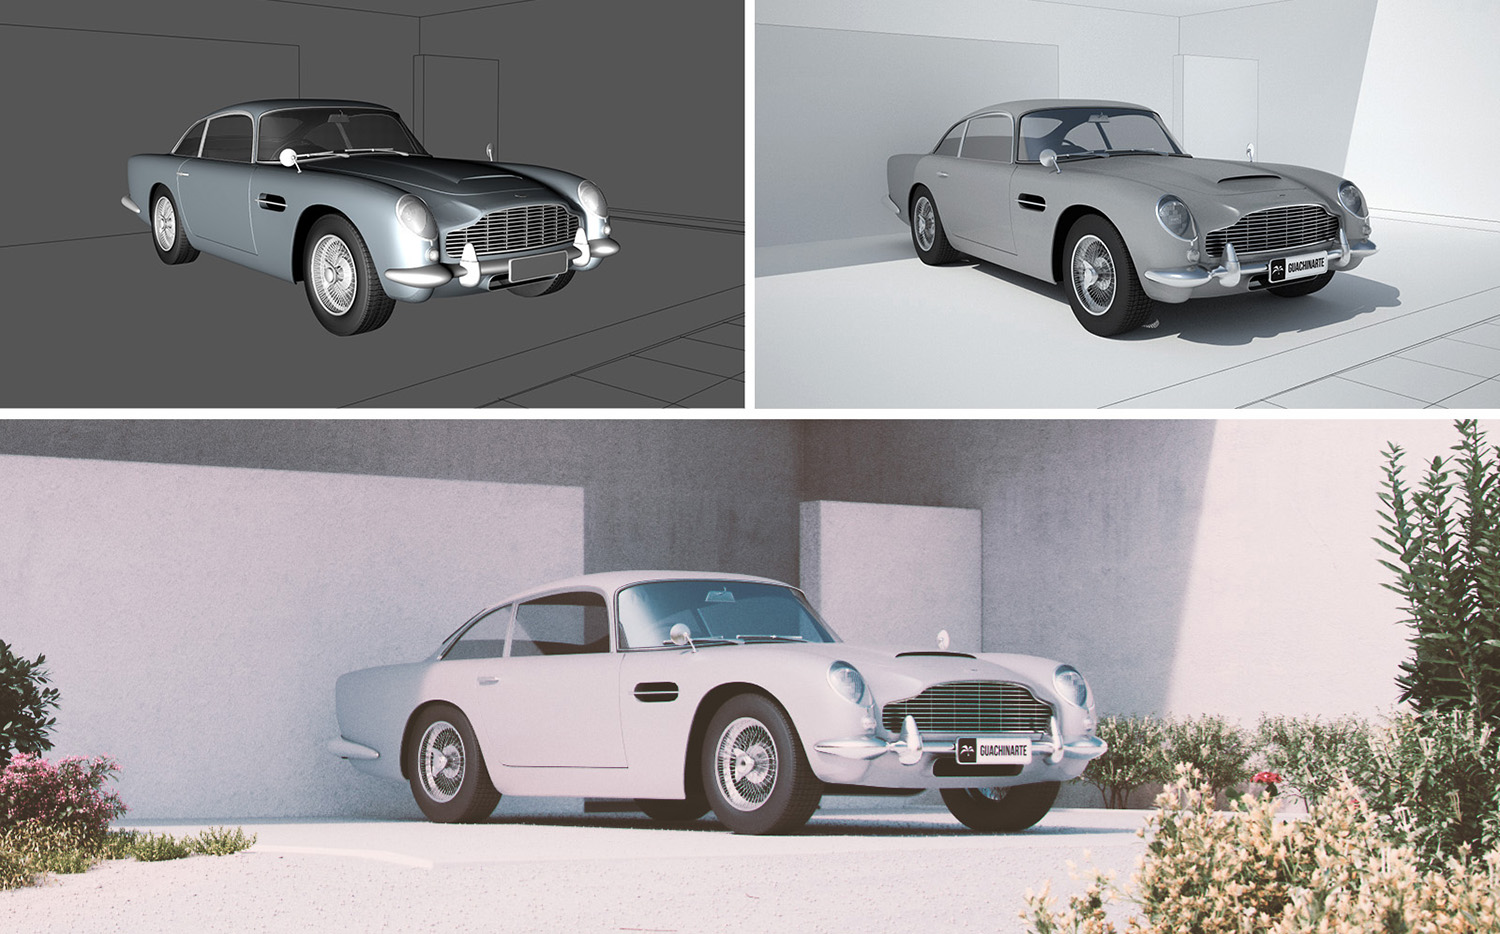
The car model is from Archive 3D. Just had to create the Vray materials.
If only it was that easy to get an Aston martin outside the virtual world... but still, thanks archive3d.net for the digital version. http://archive3d.net/?a=download&id=315d6747
Texturing
On the house I generally used very simple and basic materials. Nothing too fancy here. The most complex material was for the terrain. It consists of 3 textures. One for the sand and one for road, blended together into one material with a "Vertex Map" and masked with Cinema4D layers. This is to achieve a smooth transition from sand to road, and will be explained in detail below. The third texture are car-tracks I painted in Photoshop, and used for the bumps and shading on top of the first material. Then I used "Mix Textures" to blend the sand/stone and the tracks together. All in all less complicated than it sounds.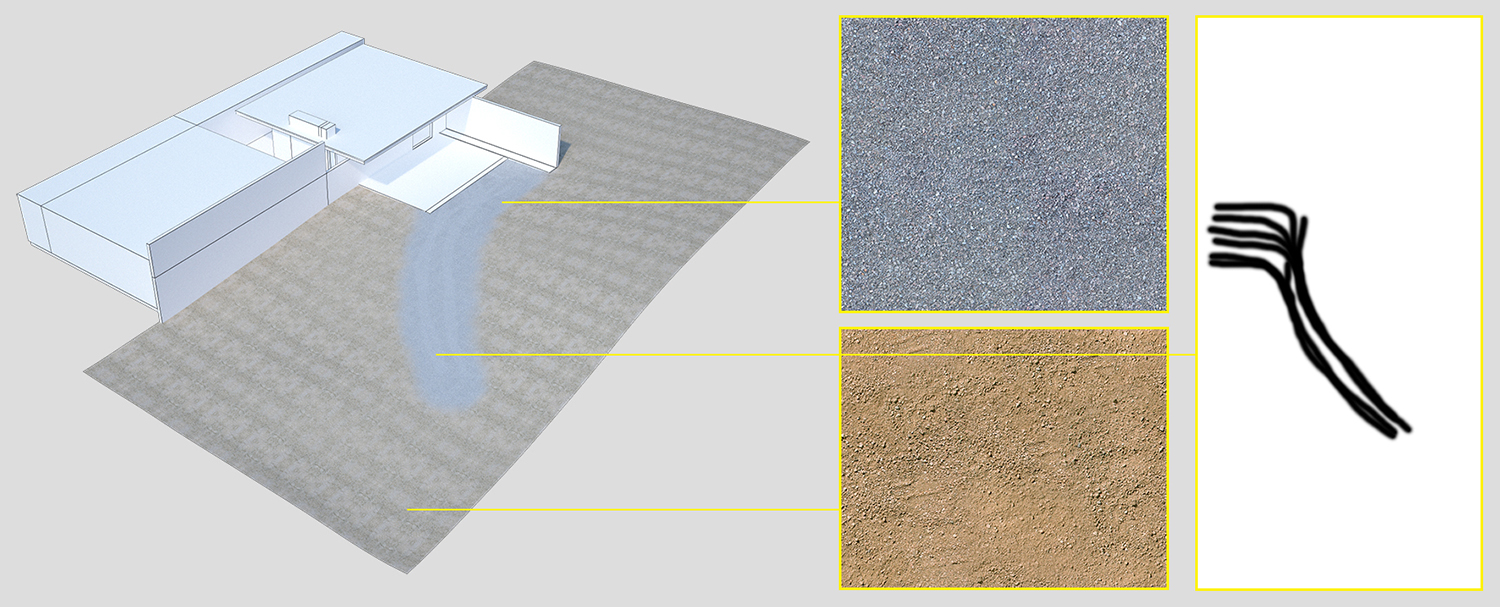
To blend the sand and the gravel on the road together, and achieve that smooth transition I mentioned above, I first painted a "Vertex Map" which I then used on a new material to separate the two main textures.
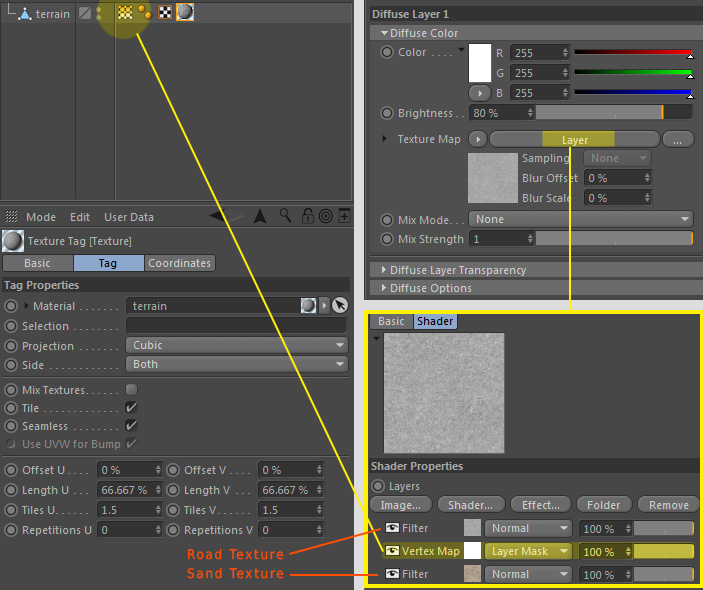
Now, I assigned a new "VrayAdvancedMaterial" to the terrain. Using Cinema4D layers, the "Vertex Map" can now be used as a mask in the diffuse channel, blending the road texture on top into the sand texture at the bottom.
In order to imprint the ruts on the gravel road, I created a new material on top of the terrain material. Enabling the mix textures option, and using the b/w ruts texture as the material weight, I was able to manage the car-tracks independently from the main material. For the car-tracks material I just varied the color and bump setting ever so slightly, to get a subtly different look for the gravel, where I wanted the car-tracks to show.
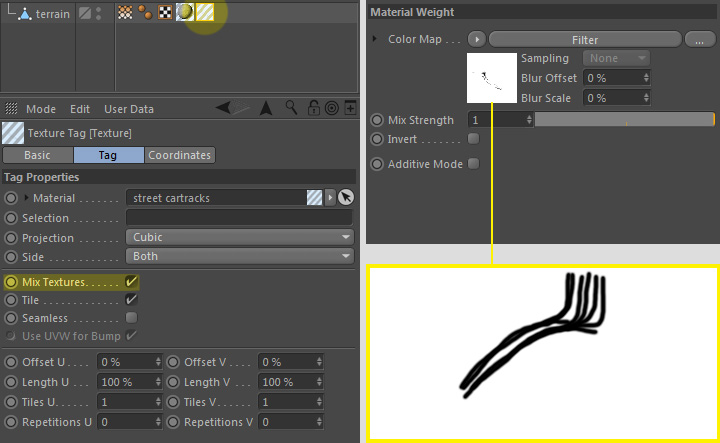
The result is barely visible in the end, but in my opinion an important detail, giving the scene depth. Here's the final terrain material.

The other very important materials are those for the vegetation. Some of the ready made plant models came with great 2sided materials which didn't need any adjustments at all, while others only had a color assigned. Or, something that every Cinema4d user probably came across, a load of obj, fbx models with no materials :( I tried to use only 2sided materials. Frankly a must for leaf shaders. Also, for added realism, I made an extra effort to create a lot of variation in the green tones. Here's one example.
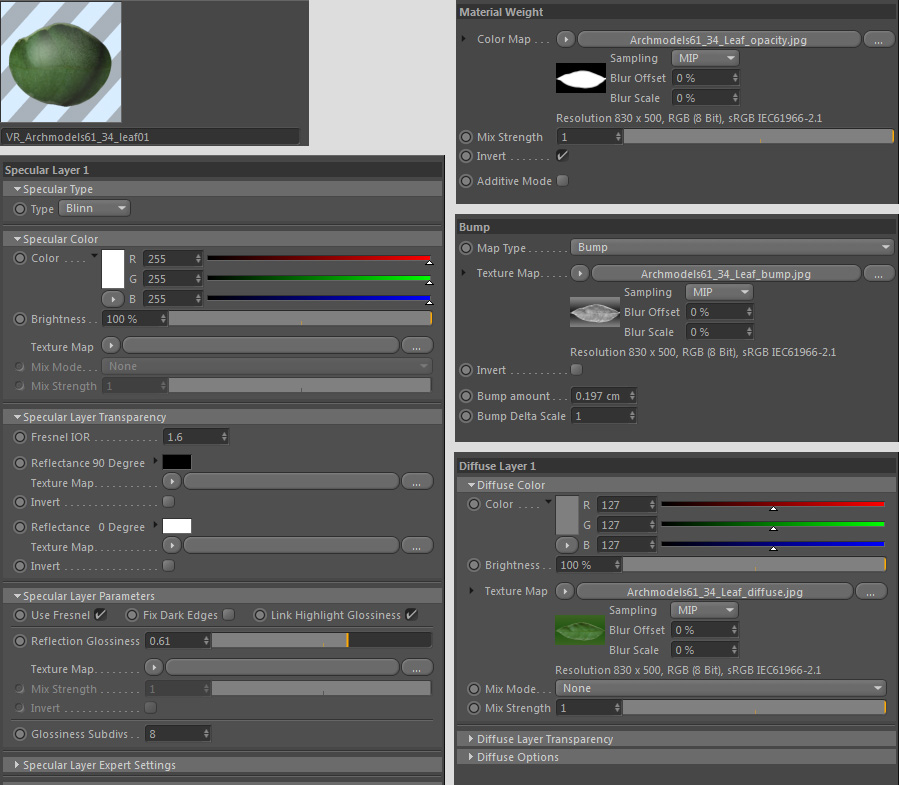
Then combined with a 2 side material.
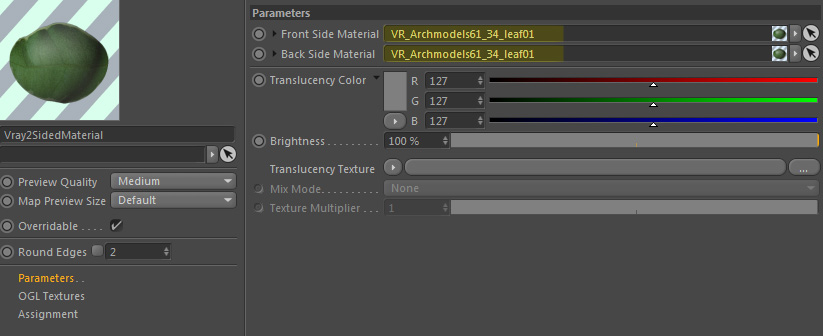
And here's how this material looks like applied to a model.

Rendering
First of all, lets take a look at the camera settings.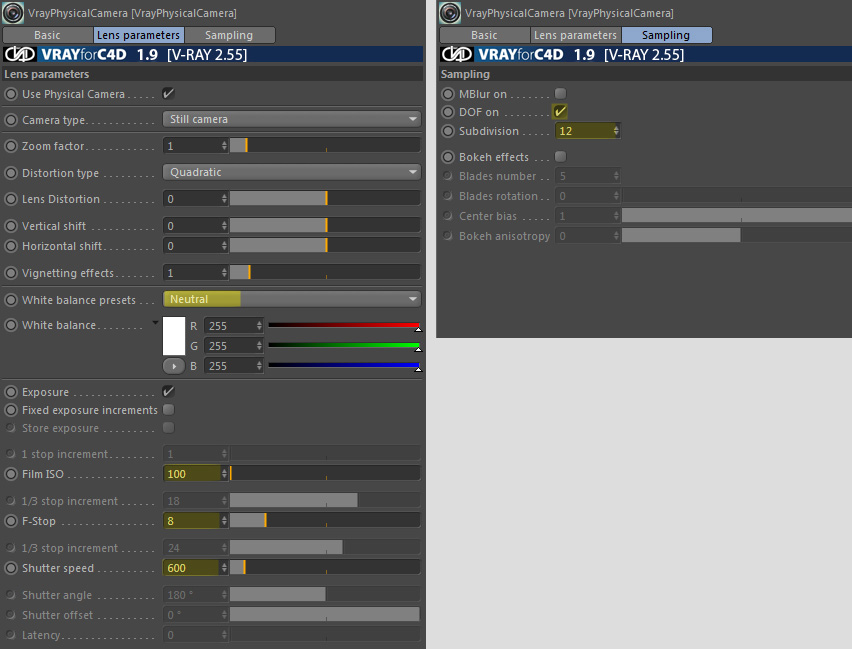
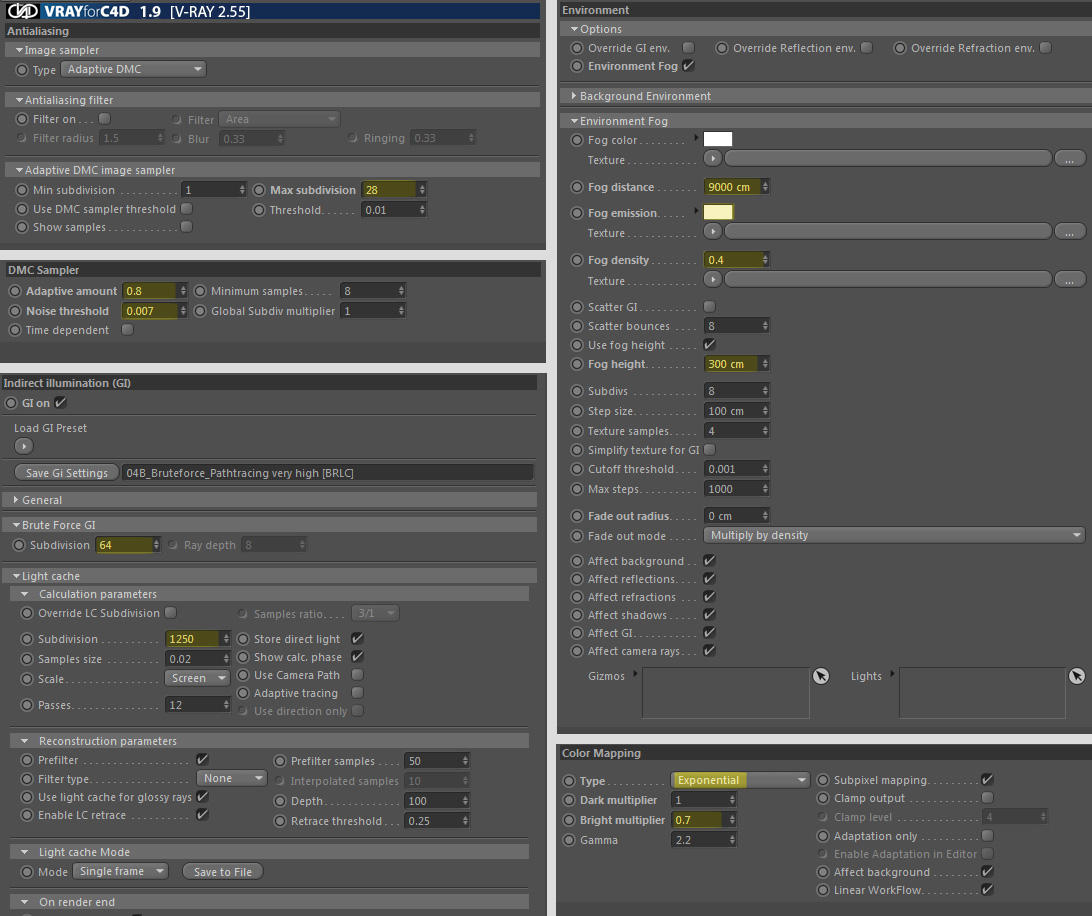
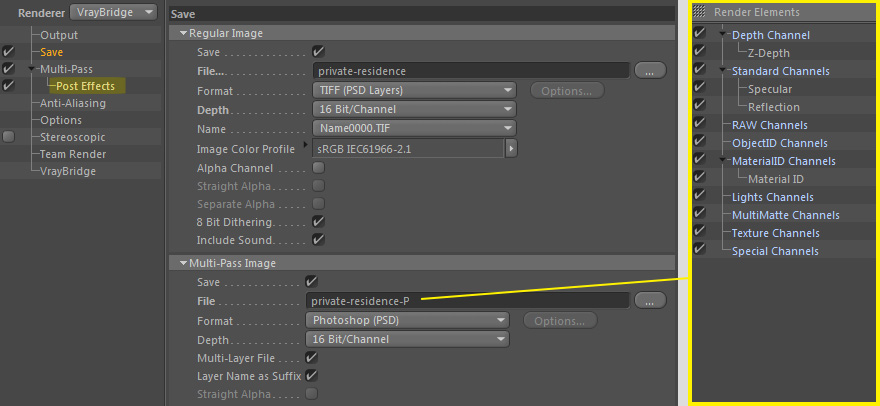
Here's the render settings for the final output with a resolution of 5888x3944 pixels.
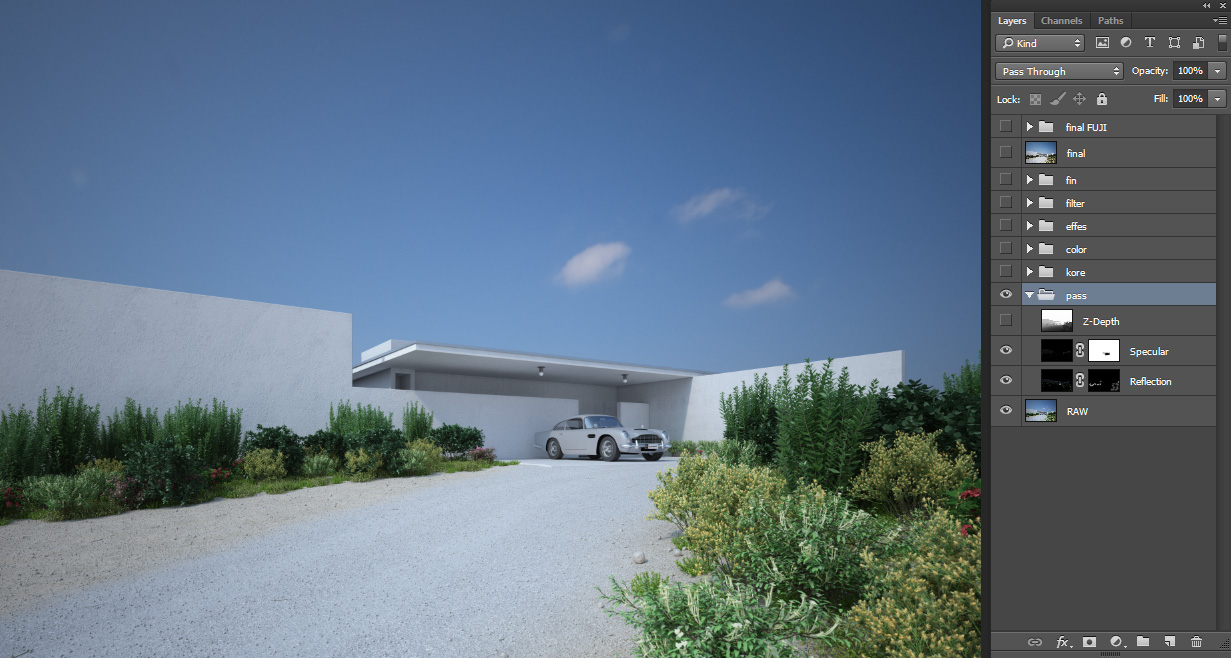
The final rendering was saved as a 16 bit TIF, with z-depth, specular, reflection, and material ID's rendered in separate passes.
Postwork
The rendering was significantly edited in Photoshop. I would say the real magic was added in post.
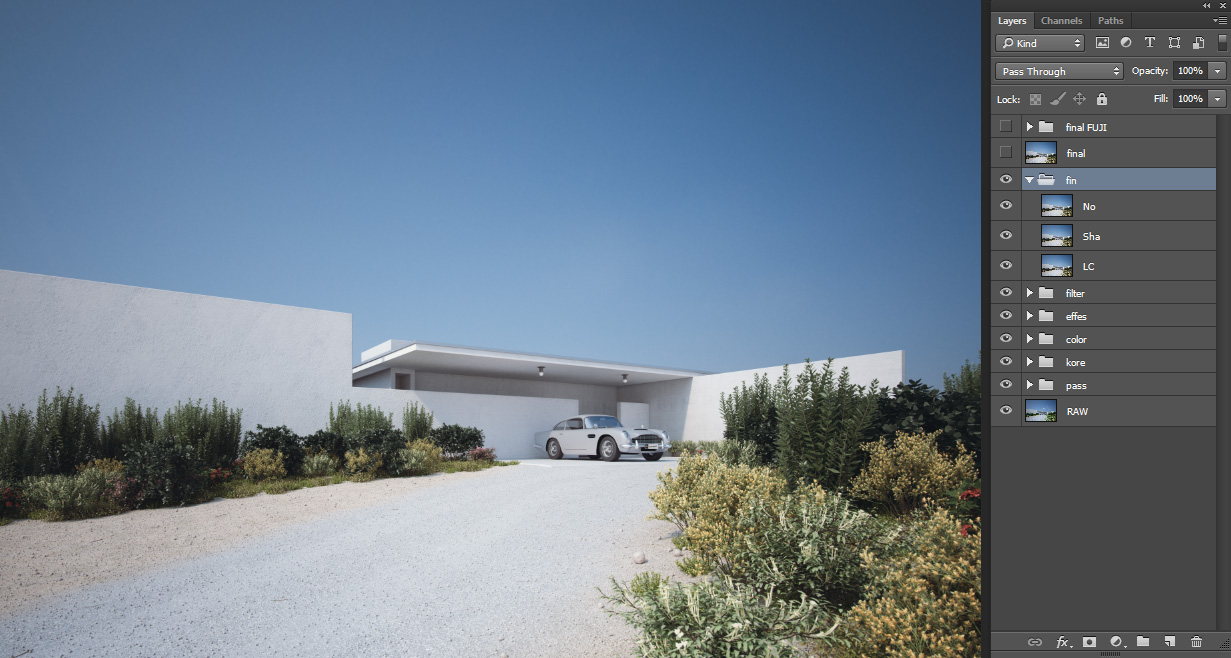
The raw render was over saturated, with little contrast and almost no depth. A perfect starting point for post ;). Over the last years I found myself always performing the same steps. So, here are my well rehearsed secret magic techniques. Because it's secret I won't go over every single layer, hah!
1. Folder "pass", all render passes are placed and adjusted here.
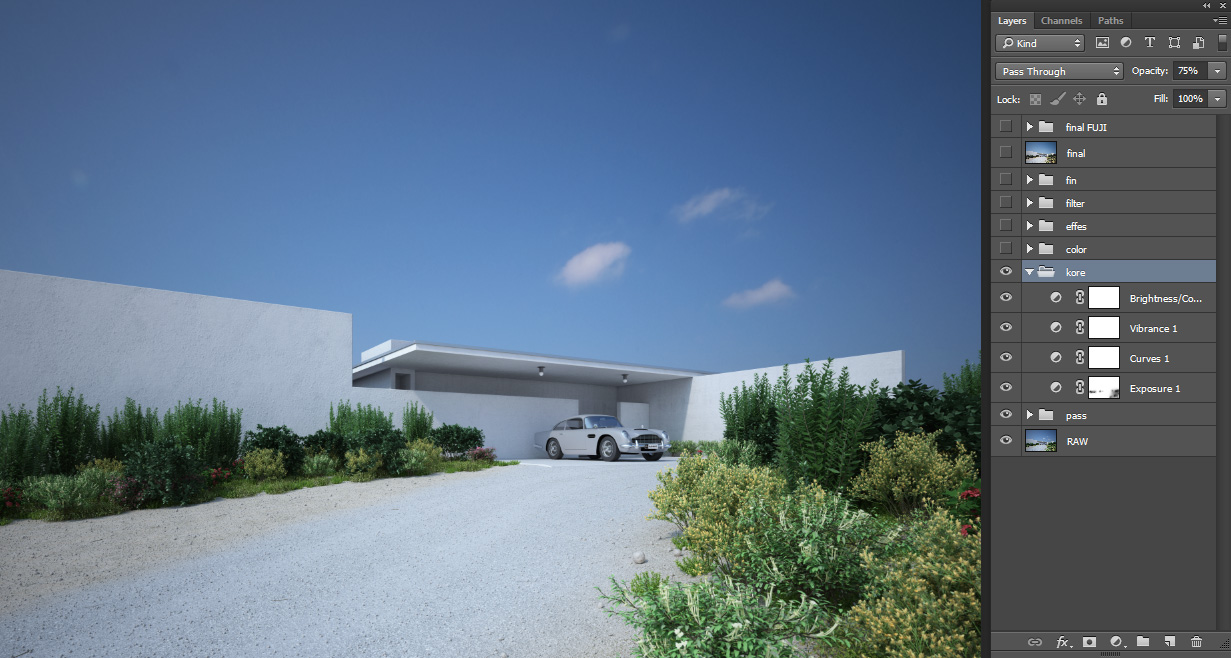
2. Folder "kore", where I do the main exposure, curves, brightness and contrast.
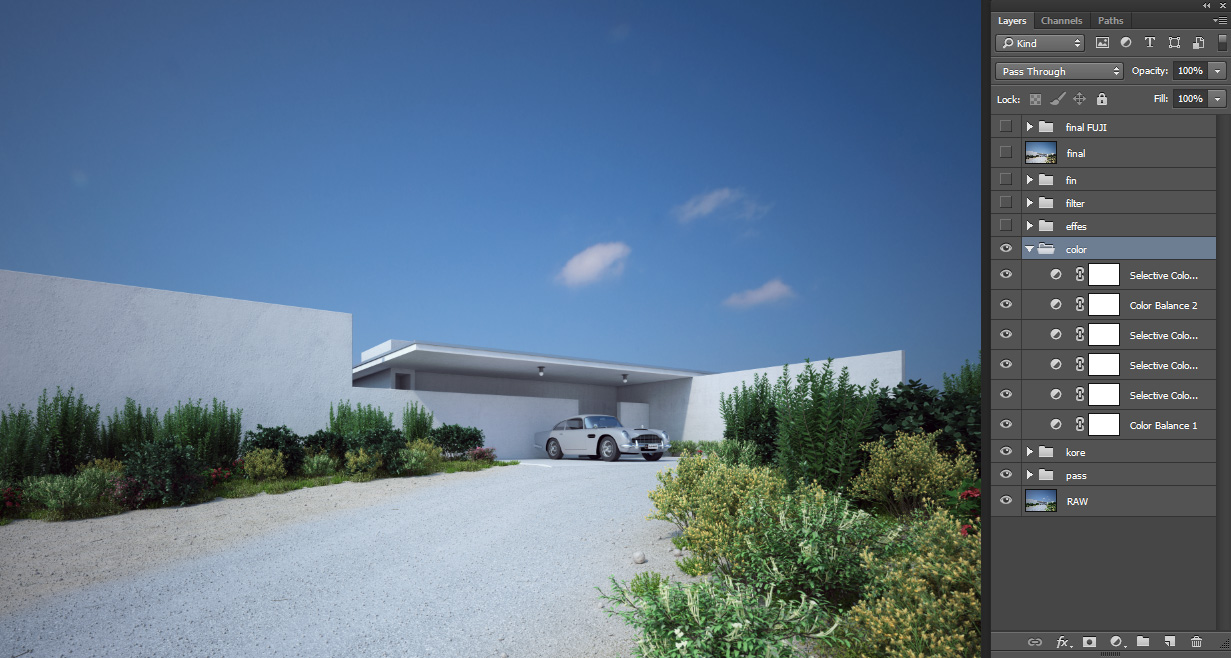
3. Folder "color", most important one, main color correction is happening here.
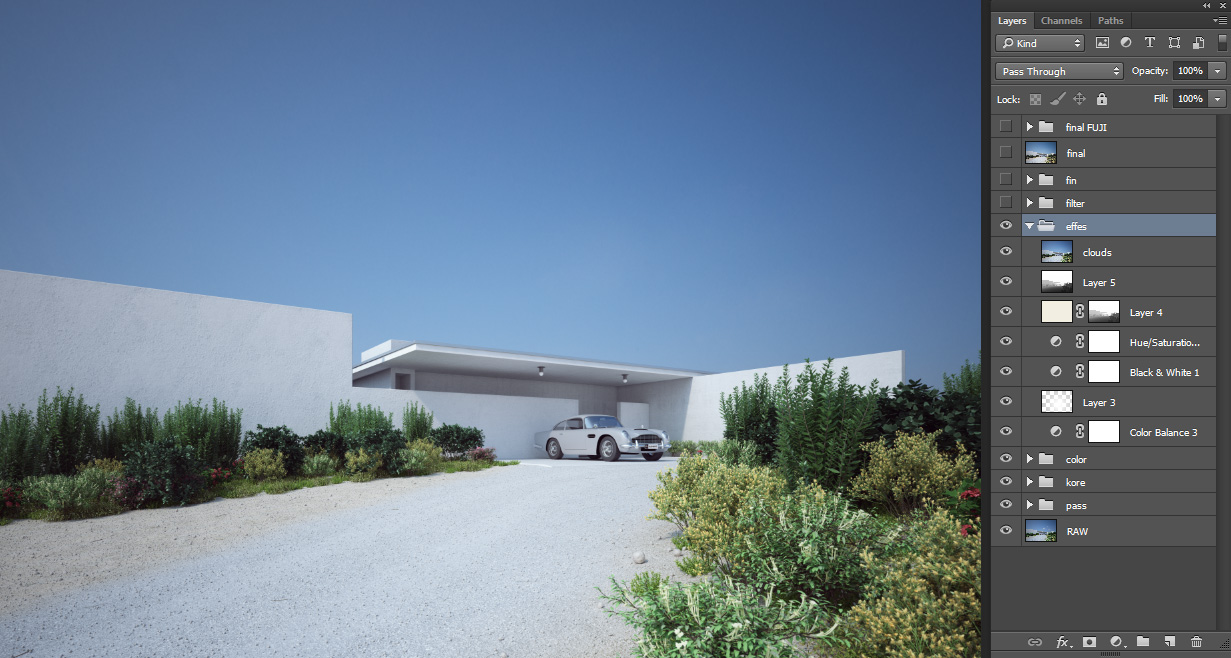
4. Folder "effes", the experimenting folder, FX.
5. Folder "filter", color lookup and so on.

6. Folder "fin", lens correction, sharpening and so on.
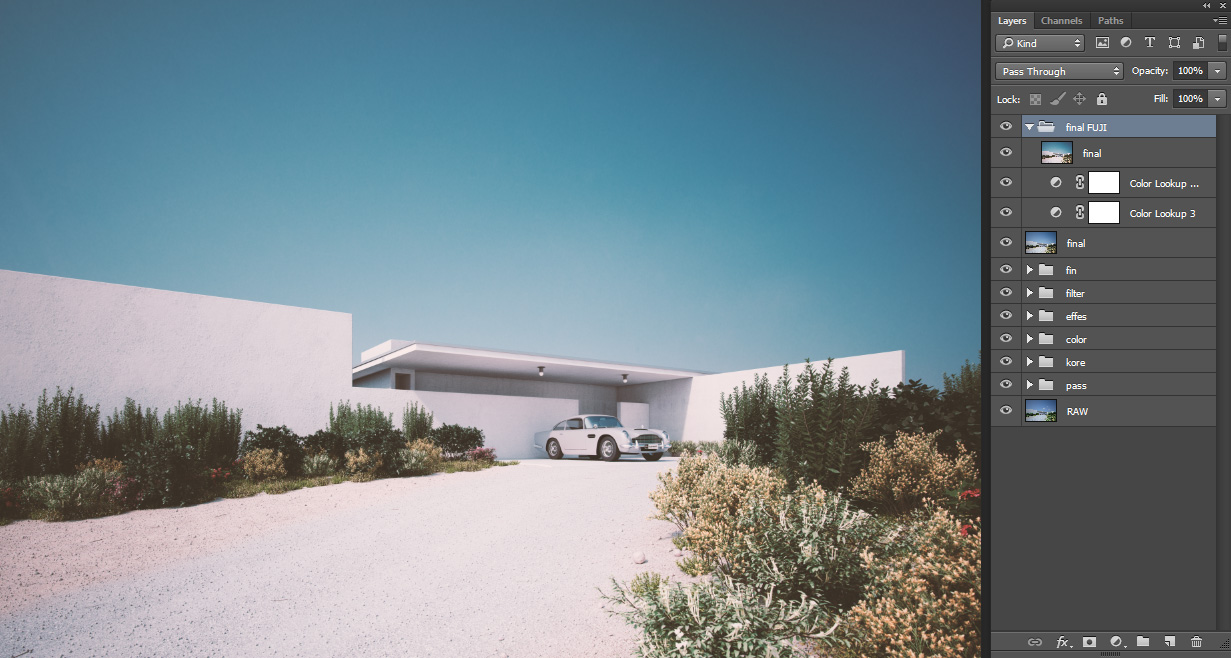
At this point I was very happy with the result, but I decided to make another more dramatic version. With some filter re-combinations from the previous version I ended with this version.
Fin
And that's it. I really hope that some information, somehow, somewhere, helped someone. Feel free to ask anything in the comment section below.Saludos
Final images: guachinarte.com/work/project/private-residence
Published: 11/05/2016
Keywords: 3d, Cinema 4D, Color Grading, Composition, Environment, Environment Fog, Filter, HDRI, Lighting, Making of, Materials, Modeling, MoGraph, Multipass, Old Photo Effect, Photo Match, Photoshop, Physical Camera, Post Production, Rendering, Settings, Texturing, Vegetation, Vertex Map, Vray
Comments: Leave a Comment (5 Comments)
Comments
Daniel Cid Gomez 17/11/2023
Dear Guachinarte, we would like you to join as an artist on artoui.com
How can we get in touch?
Regards,
Daniel
Guachinarte 20/11/2023
Hi! Preferably by email, which can be found on the info site ;) www.guachinarte.com/info
Efraín Rodríguez 27/04/2017
I'm impressed with your job with C4D and Pohotshop. I want to know what is the vegetation kit that you use in this model. Thanks.
Guachinarte 28/04/2017
Hi Efraín, thank you. I used some Evermotion, Turbosquid and HQ-Plants, if that's what you mean.
Mukondeleli Ratshilavhi 16/04/2017
I'm living your work flow ...how your braking it down to bite size parts